Showing posts with label photo guide. Show all posts

Monday, September 10, 2012

Introduction to Adobe Lightroom and Customizing Presets

There's been some buzz around the Mamatography Photo Sharing & Critique group with questions about customizing Lightroom "Presets".

What is Lightroom you ask? Adobe Lightroom is by my own definition, a photo editing and correcting software. Think of it as a more in depth version of iPhoto or Picasa, YIKES!! Many a Mamatographer are entering the business of photography today. Some are not. No matter your cause, we all need to DO SOMETHING with our photos, no? 


Lightroom is a means for that something.

Here, you can import your photos from your camera card or hard drive. Then, create dynamic black and white or color enhanced images. Correct "exposure", color balance, sharpening, noise reduction and MORE!


To the left you will see the Presets panel. This is where you will find Adobe's default presets as well as be able to make your own.

Presets are a series of Lightroom settings whose information is stored as a set of color and correction controls. If you are familiar with Adobe Photoshop, you may of heard of the term "Actions". These are also sets of settings which are recorded and then applied to one or a sequence of photos to save time and produce professional effects to your photos.

Note: Actions and Presets are heavily used today. Enter into your photos with a light hand so that your personal style remains intact!

Below you will see that I used a default preset, an Orange Filter, under LR B&W Filter Presets. These offer a wide range of instant, high quality B&W settings to apply to your photos. Sometimes I really like the infrared, sometimes not! The Orange is natural yet produces tons of depth and contrast.

Below those, you'll see the remaining list of default presets. Play with them! But output them sparingly. Not all of them are fit to print or even display on Facebook for that matter.


Okay, let's make our own Presets now! Below is a list of my few personal presets. I usually name them by what ever project I'm working on. 
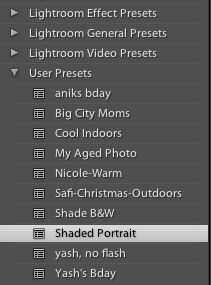

This is because 1 recorded preset from 1 shoot won't necessarily translated to another project due to lighting conditions, color temperatures, and general exposure issues. BUT presets are great to use within the same shoot because you can "batch" apply a preset to a sequence of shot saving TONS of time and effort!

This is really the backbone of why pros use Lightroom, to crunch down time while outputting FABULOUSLY styled images!

Can you see why this would be great for moms too? Never enough time in the day to sit down and look at our pics yet beautify them. 

Below is the Presets dialog (located at left in Lightroom). To the right of the box is a plus sign, click it. Note: that you must have a photo selected with adjustment settings (i.e. exposure, color) already made to then "record" a preset.

 Next, this box below will appear. Name your presets and if you'd like, chose the photos settings which you would like to be replicated.


Done! You've now created a custom Preset! Now, all you have to do is click on the next pic or Shift, Click on a series of photos, press on your new Preset and VOIL'A, you've got your self a whole shoots worth of professional, corrected images!

Pat your self on the back : )

Happy Shooting, Vicky

Wednesday, August 1, 2012

Travel Photography for Mamatographers

This year we've been on the move quite a bit. I'm thankful for this because I feel more creative when traveling outside of my element. Don't we all?

It turns out that we will be living in Panama a great deal of this year. After returning home after a 9 week trip down there, I've found my self feeling slightly strangled by the amount of personal photos I shot without time to output them. It took a great deal of trouble, shopping in the allies of Casco Viejo, to find a "Pollera" for Safi. Then there was this shoot at "Mi Pueblito" Indian Village in the equater-ish heat, she was not a happy camper 20 minutes in! But out of the 400 FAST shots I took, I've never been more pleased with Safi's modeling skills. 


It was also nice to have a new friend joined us with her 3 girls-made for a fun shoot! So with the effort that comes with being a Mamatographer, I'm pleased to have the chance this week to phlog these photos and send them off to the printer! I use Nations Photo Lab by the way-excellent quality.


A Pollera is the National Costume of Panama.
What's your plan of action for shooting while you're traveling? Do you have both an SLR and a point and shoot? "What to take, what to leave behind?" That's a question we all have to ask our selves before venturing on a plane with our kiddos. After you've rounded the car seat, the stroller, the sanitizing devices, and iPad (that you're not allowed to use), where does that leave the camera gear? Before, all I had to think about was what was I taking to shoot with. Now a little life rests in my hands. 

Here's some tips that have helped me to shoot when traveling:
  • Determine WHAT you'll be shooting, do you need multiple lenses?
  • Use a durable gear bag that has compartments, you can always pack diapers, snacks, etc. in the bag separate from your electronic gear I'm really into this Lowepro Pro Roller Attache Bag cause it has wheels, NO SHOULDER STRAINING!

  • Bring MANY memory cards! You're gonna need them.
  • Pack BOTH a DSLR and Point and Shoot, if you have them
  • Use the point and shoot more for snap shots, like restaurant outings or by the pool and the DSLR more for scenery, those really special places that should reflect the highest quality
View of Panama City from Casco Viejo


A fun pool shot w/ my Point and Shoot-I retouched a bit for a Kodakrome look

Down on Rio Mar beach with my Point and Shoot. My Leica snaps sharp B+W's, no Photoshop on this one!


Ahhhhh...I've sent my travel photos out into the universe and it feels GOOD!
Happy Shooting, Vicky

Friday, July 27, 2012

Mamatography in the News & a NEW Workshop

Read the Mamatography feature HERE 
I am behind on tutorials because so many exciting things have been happening! Traveling, SLEEPING, cleaning house-not so exciting-planing workshops, etc. 

There's a vigorous list of Mamatography techniques to blog about if I EVER get a chance to edit my photos! I see a late night on the horizon...good thing I caught up on the zzz's. Anyway, fruitful, FREE photography techniques are coming right up! Until then, here's some news I'd like to share...

After returning to the states last week, I was pleased to get an email from a kind lady writer from MomsMiami.com. That's the ALL THINGS MOM site for the Miami Herald. I was to be featured in their monthly Mom, Inc. article as a self-business starter inspired by motherhood. 

The structure of these features are very helpful to moms starting their business from scratch! 


Next, on the share list, I am teaming up with one of my favorite South FL photographers, Tricia Krefetz of Click. Capture. Create. Photography for a workshop of SPECTACULAR proportions! On Sunday, Aug. 26th we'll be gathering at The Palms Birth House in Delray Beach, Florida for "Photography 101" just for mommies who CLICK!


Seats are limited and can be reserved by emailing Triciatricia@clickcapturecreate.com

Stay tuned in the coming weeks! I'll be summing up Summer Shooting tips and so much MORE!

Happy Shooting,
Vicky

Thursday, June 28, 2012

Mamatographer to Admire, Leslie of May Faith Photography :: Mamatography Photo Workshops

Recently, I've been paying great notice to my current and past students in their dynamic growth as photographers. This post is no self pat on the back but a shout out to one particular Mamatographer that has knocking my socks off with every shoot she posts via Facebook.

She is Leslie Carpenter of May Faith Photography.


Last year, Leslie and I met when she took one of my webinars just as I was getting Mamatography off the ground, when Safi was just 2 months old. 

I thought I had my hands full but Leslie not only had an infant herself at the time but 2 more little ones AND she was striving to start a photography business. 

Over a year later, this mom of 3 is kicking ass and taking names! 

She's shooting every chance she gets, building her portfolio and fan base to a pro level that is awe inspiring. I seriously don't know how she does it, my brain is mush most days from toddler tantrums!

Located in Vancouver, Washington, Leslie has no shortage of lush, Pacific landscapes where she coordinates test shoots with make up artists, florists, H&M-TEAMS OF PEOPLE! 

These "productions" result in stunning imagery that is turning heads within the photography community and beyond.

I especially love her composition and retouching techniques. She always seems to be paying attention to detail! But most of all, her work is FRESH and original! 

May Faith Photography is: Natural light Photographic Artistry, specializing in making your dream portraits a reality.


Hear how Leslie describes her business and her FAV piece of equipment:
"I do a wide range of types of photography...everything from family portraits, outdoor,pets, events, boudior, location shoots and enjoys doing new things! I love capturing moments to tell a story. My main goal is bringing a professional, fun atmosphere with quality photos that you will rave about for years to come."
This Lens is Available in the Mamatography Store
"My favorite piece of equip right now is the 28-75 Tamron Canon mount. It's amazing because of the range for portraits, and also fast with it's 2.8 aperture. I haven't taken it off my camera since I purchased it. I would recommend this lens or the Canon lens which is the 24-70 2.8. It's perfect for the work that I specialize in. My next lens I will be getting is the 85mm 1.8."


Thank you Leslie for sharing your artistry with fellow Mamatographers!

Happy Shooting, Vicky

Thursday, June 14, 2012

"Retro Safi Takes Panama" Photoshoot and Lightroom Tutorial:: Mamatography Photography Lessons for Moms

 For a while now I've been holding onto a vintage toddler
dress that my mom gave me. Safi's Daddy and I thought that sunny Panama was the best spot to finally shoot some photos of her wearing it before she outgrew it...any day now. So on a HOT morning in Rio Mar we suited her up, I grabbed my gear and off we went to the beach side pool at our home away from home.

This day I chose to shoot with my long zoom lens, a 70-200mm. I like the background blur, a.k.a. bokeh, the longer lens gives my images compared to lenses with shorter focal lengths. These days I almost always have to shoot with a zoom to take shots of Safi. She's just too damn fast for a prime/fixed focal length lens (i.e. a 50mm-very popular for portraits).

Luckily, Daddy was around this day to spot Safi while I was shooting. Considering we were on the pool deck, this was a must! He also was able to put her hat back on EVERY TIME she threw it to the ground...grrrr.

If I were to improve upon my images I would've had a third person hold a reflector to fill shadows, but I was short a person and reflector which I left home in Florida...we make do!

I've said it before and I'll say it again, when shooting young children you MUST keep snapping! Make sure that your camera is set for continuous and not single shot mode. Hold down the shutter release button and don't let go as long as your little subject is in your frame. Same goes for all portraiture. If you want to catch moments as they happen, keep snapping and you'll find that you'll turn out natural "candids" rather that traditional poses...posed has it's place in photography too however.

For this series of shots, I knew that I wanted not only the clothing to be vintage but the style of the photos to be so as well. THINK 1960'S KODAK PRINTS.


To Post Shoot Process my images I always start with using Adobe Lightroom 4.

I don't often use actions and presets that I haven't my self created but the new version of Lightroom offers a few default presets that I find very helpful including their General Auto Tone.
For this retro series, I knew I wanted to simulate an old color photo or Polaroid. For this effect, I started with the Old Polar default preset and then made fine tune adjustments using the Develop panel (see screenshot 2). A few qualities that make Polaroids recognizable are 1. Color Warmth-each photo has a yellowish tint 2. Color desaturation-see the lack of green on the leaves and 3. Over exposure..BRIGHTNESS!
Note: If you DON'T have Lightroom, you can use any photo editing software such as iPhote or Picassa to creat a similar effect. Just use the steps above in your software's tool panel. 
Lastly, I added rounded white borders as a Polaroid would have but with a modern touch.


{Notice how flat the image is on the left. This is from shooting in RAW format. If you don't want to have to make color and exposure corrections, I don't recommend shooting in RAW-stick to JPG}


Check out this video clip and see how I'm constantly AND literally always on my toes when shooting my 18 month old! If you've perfected the art of "posing" a toddler will you let PLEEEEASE let me know?!


I hope you enjoyed another Summer photo tutorial. More to come!
Happy Shooting, Vicky

Wednesday, February 22, 2012

Mamatography ebook: NEW AND IMPROVED

Pick up a copy of the NEW & IMPROVED Photo Basics & Beyond ebook HERE to keep in your camera bag!

Topics include: Camera Settings, Lenses & Focal Length, Flash Basics & MORE!

NEXT UP in Mamatography BOOKS: Composition for Portraiture & MORE
Stay tuned...

Monday, January 30, 2012

Photos with Texture

This weekend I had the pleasure of teaching the Mamatography Photo Basics II Workshop Retreat at Butterfly World here in South Florida. It was a HOT but lovely day.
I asked my Mamatographers to share their images in the new Mamatography Facebook Group, Mamatography Photo Sharing & Critique, to see what we came up with on this collaborative shoot.


Here's an example of a shot I took at the end of the workshop. The day's light was getting dimmer and the flower garden had corner's of moodiness. I liked how this shot depicted a cool tone. Not so exciting at first glance..but I could see the potential.


The image reminded me of a Georgia O'keeffe painting, a style I spent sometime on reflecting back in college when I was shooting film.
So with the painterly effect in mind, I decided to impose a watercolor texture to my piece.

I love to create and scan textures but my time these days is VERY limited since I'm busy mothering a 1 year old! I did a quick search on paper textures and found this awesome site, www.lostandtaken.com .
I gratefully donated $4 to the site for the wide array of textures this artist has created and shares for free!

I knew I wanted a watercolor undertone w/ a subtle pop of color so this is the texture I chose:

Credit: Lost & Taken

In Photoshop, I created multiple layers of the original image changing the exposure and opacity of each layer to create a kind of High Definition Range (aka HDR) effect. Then I did the same with the water color image placing those on top of my photo. (For more info on Photoshop and using layers, check out my Photoshop Webinars HERE)

Here is my final image combining multiple copies of my photo and the watercolor image.


If you would like to join the Mamatography Facebook Group, click HERE

Happy Shooting!

Sunday, November 13, 2011

My first Video Tutorial is up! Check it out to learn about using FLASH.


In this first of many to come video tutorials, I talk about starter flash info and techniques.


Here I recommend different flash models including Nikon SB700 or SB800 and for Canon shooters I suggest the 430EX to get going with brighter, crisper shots.


If you enjoy this video, please subscribe to my YouTube channel and this blog for free photo tips and tricks. For One-on-One Webinars on this and other topics go to www.mamatographylessons.com.

Friday, November 11, 2011

ISO aka Film Speed :: Book Excerpt

ISO is the first and fundamental camera setting. Photographers all have there go to practices for starting out on a shoot. Mine however, is to first place judgment on my lighting conditions. By doing so I am able to determine this first camera setting of those I’ve mentioned on the previous page.

ISO’s are numbers listed as “stops” within your camera’s menu that tell it whether you’ll be shooting under bright light or low light conditions.
Below are examples of ISO settings. Following, you will see how I have adjusted my ISO according to what strength of light I was shooting under.

{Bright Available Light} 80, 100, 200, 400, 800, 1600, 2200 {Low Available Light}

All Images ©Vicky Scesa
ISO 400: I was using 1 strobe light and a gold reflector

All Images ©Vicky Scesa
ISO 800: I had Low Available Light

All Images ©Vicky Scesa
ISO 200: This was a very bright day with ALOT of Available Light

Please note that all camera settings may have different increments than I have described but these are the settings I recommend changing between, as these are whole stops, which will give you a visual difference in exposure between settings.

The problem with high ISO’s in most cameras is that when the number is increased the picture gets grainier. Now, in the digital age, this YUCK, for lack of a better word, is referred to as “digital noise” So, proceed with caution…

Sunday, October 2, 2011

An Introduction to Mamatography


As a chronically inspired and busy new Mama I am always seeking short cuts in learning new skills. I was fortunate to have started photography as a teenager in the former age of film and even so into my professional career. However, there were no quick detours in the darkroom. Every session under the red light was a painstakingly slow process.  I loved every minute of it! With that said, I love that photography has become something tangible and real to REAL people. 

Through my years of shooting, processing and teaching I've come to the conclusion that knowing how to use a camera (well) may be just as important as using a computer, an oven, etc. etc.. It's survival in the modern age of gadgets and social networking. This is why I have founded Mamatography™ Photo Workshops.

Whether you're capturing moments of your little loved ones, selling products on the web or pursuing your own business as a shooter the foundation for any photographer hasn't changed through time. Before the reward comes the process...and the process can be just as rewarding.

Use this blog as a go-to photo guide, or as a companion to my video tutorials, live webinars, or local workshops, to get you where you feel your photography needs to be, lightning faster than the process was for me. 

I'm thrilled to share my passion with other Mamatographers!
Happy Shooting,